Monday, 1 August 2011

tokidoki Punk Lash Mascara

Hello all you readers! How are your summers going? I hope you’re enjoying yourselves. I promised you guys a mascara review, and I finally got a good set of photos. I will upload them in a few minutes after this is posted, because I am using a different camera, and I have to quickly set up the software. The photos are higher quality, and I will use this camera when I am at home, and the other camera will be used when traveling. Well, onto today’s post!

 I walked into a Sephora, seeking a quality coloured mascara. I have used a few in the past, but I was looking for one that was highly pigmented. I looked around the store for almost an hour. They did sell good coloured mascaras, but the colours were limited, and not as bright as I would have liked. I came across the tokidoki section, and remembered the brightly coloured cosmetics I had seen a few weeks before. I spotted the cutely packaged mascaras, and picked up the blue one, but ultimately decided on the bright green. The bright green is actually called “Mad Rocker”, and it is surprising bright.


As you can see in this picture, my lashes are already dark enough and long enough.


I curled and separated my lashes with lash comb, and applied one coat of this mascara on my top and bottom lashes. As soon as I applied the first bit onto my lashes, I was impressed. The brush left absolutely no clumps on the first stroke, which is usually what happens with a lot of mascaras. The brush effortlessly lengthened, volumized, and separated my lashes. The bristles on the brush get a firm grip on your lashes, and evenly distribute the product, so you do not have to go over it if you do not want to. The colour showed up exceptionally well on my jet-black eyelashes. It did not deviate from the colour inside the clear tube.


Let’s take a look at the brush. The bristles are shorter than most mascaras, but the clever design allows for no clumps, even on the second or even third layer of mascara. You get the ideal amount of product, onto your eyelashes, and it does not make the lashes stiff or flaky. However, my lashes still maintained their curl. I am really impressed by this mascara; it does the job as it is supposed to, without flaking. This is my second time using this tube of mascara. The first time I had used it, I had left it on all day, and it did not irritate my eyes, smudge, or leave a bit of a green dust under my eyes. I even rubbed my eyes a couple times out of sleepiness, and it still stayed on. Another amazing thing about this mascara, is that you do not even feel the product on your lashes, it feels naturally light.


Another thing that I like about this product is the smart packaging. The product comes neatly packaged with cute illustrations by creator Simone Legno, all over the clear packaging, which are reminiscent of Japanese manga characters.  The tube itself is slim with a black cap and clear tubing, so the colour of the mascara can be seen clearly. There are also little illustrations at the bottom of the tubing. Everything about this product is cute and functional. Also, it is formulated without parabens, which is a positive feature for those with sensitive skin, like me. I definitely recommend any of you to go out and try it. You will not be disappointed, as there are four different colours to choose from: Baby Rocker (Blue), Mad Rocker (Green), Sabochan (Purple), and Cactus Rocker (Black). I believe that Sephora is the only store that this wonder product can be purchased at, but maybe you can purchase it from the tokidoki website. I will still post the links, just in case.


Sephora Link:

Tokidoki Link:


There you go the end of my post. I hope you enjoy this product as much as I am. Thank you for reading, I appreciate every view that you guys contribute to my blog. Well, time to get to bed for me, it is now 1:00 AM on the dot. Take care, everyone.


Happy Shopping


^_^

Saturday, 30 July 2011

Beauty Fixers


Hello all of my wonderful readers! How are you? I was supposed to post a mascara review, but the photos were poor quality, in my opinion. I tried taking them in daylight, but sadly, it rained for the majority of the day. Thank you rain. I will have the new pictures up later on today though, that is something I can do for you guys. Well, I said that it was going to be a double post day, though technically it is already the next day for me, I will still post something for you. The title is straightforward and accurate too. Let’s move onto today’s post!

If you are similar to me, you drop everything, at least once a day if not twenty times during a single day. Cups full of water, pancakes, and makeup. Or if you do not drop things at an alarmingly harmful rate, then you could possibly smudge your eyeliner...across your nose. Sadly, I do this sometimes, but I have three tips that are sure to fix three common beauty blunders.


Tip 1:  Many of you have little time to apply cosmetics in the morning, which can lead to mistakes. Often, the makeup remover will be too far to get or too hard to find in order to save time during the morning rush. To erase or diminish the appearance of mascara marks on the brow bone area or even eyeshadow flecks on the cheeks, take a tissue and put a bit of lotion on it and rub the mark away. I do not advise any of you to use this as a makeup remover; however, it is just a quick fix for mistakes.


Tip 2: To get rid of any flyaway hairs, lightly mist hairspray on a baby hairbrush (or any brush with extremely fine bristles) and gently pat or skim the top of the flyaways to make them go down.


Tip 3: If you ever get nail varnish all over your hands or cuticles, finish your manicure, and go for a shower when it’s dry. When you come out, your nails should be cleanly made up. Also, if you desire a matte finish on your nails, skip the topcoat. A bit of the varnish might chip, but a quick touch up should fix that.

There, three easy tips to fix three common mistakes. The mascara post will be up today. If I have to retake photos again, the post will still stay up, and I will add new pictures if possible. Thank you for reading, I hope I helped.


Happy Fixing


^_^

Friday, 29 July 2011

Fall Fashion Basics

Hello you avid readers, how are you all today? I’m finally back from my trip, and it has been a fun one. I bought a new electric guitar and amp on my voyage, and I am really enjoying it. The amp is just big enough to wake up the entire neighborhood ;). Well, enough about that, I have a few reviews and clothing posts in mind for this week, and they should come out daily, if not every other day.Just click the pictures to go to the links. So let’s start on today’s post!

This fall is taking a walk on the more mature side, as sophisticated cuts and clothing pieces are making their way into the fall. While shapes are becoming more evolved, it seems as if the inspiration for these trends is from the sixties and seventies. High-waisted skirts are taking on the once popular shape of the sixties, and pants are adding a modern take on the classic flare pant. Try to find a high-waisted skirt with a bit of flounce to it, such as these ones:


Now, the shape is a bit different than the ones introduced earlier this year, as these have a slightly older look to them.


 Expect to see a lot of denim in cleaner and more refined cuts, such as a skinny-legged flare jean, or ultra-skinny jeans in warm coloured tones. The best way to find your favourite cuts, are to just to try as many as you can.


Another trend that is sure to pop up during the fall is the increase in the popularity of the basic tailored blazer jacket. The basic black blazer seems to be a favourite, but I have a feeling that jewel-toned versions of this jacket will become more popular in the fall. 


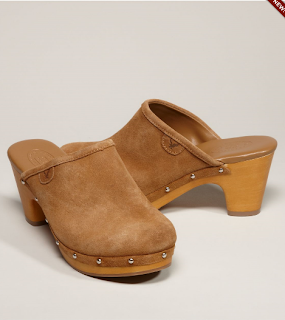
I see boots and heels with a chunky heel are going to be popular this autumn, as it goes well with the aforementioned pieces. I recently bought a pair of chunky heels from American Eagle, which I will feature in a clothing haul post. The ones below are high-heeled clogs, which I am on a hunt for the right pair.


There you have it, the basic pieces for this fall. I will have more fashion posts up, possibly this week, and I will have a mascara review later on today. Hope you enjoyed this quick fall fashion guide. Thanks for reading. Oh, and those of you subscribed by email to this blog, I will be changing the delivery time to 7:00pm-9:00pm, instead of 5:00pm-7:00pm. This just makes it easier for everybody. Well, I will see you all in a few hours.


Happy Clothes Hunting


^_^

Monday, 25 July 2011

Bright Blue Earrings


 Hello my wonderful readers! I hope you are all well. I am currently out of town for a while, so my blogging will not be as regular, but do not get disappointed. I will try my best to blog as much as I can.  I got back from a summer fair very late last night, which is why I did not blog the previous day. Well, onto today’s post!

There are many beautiful colours and shades out there, but my favorite colour has to be blue. It’s fresh, full of joy, and gives everything a modern touch. Blue earrings look even more bright and joyous during the summer months. In my opinion, earrings in a sea blue or a royal blue are the colours to go for in the summer. Here are a couple of my own pairs, to give some inspiration:


This pair was purchased from Claire’s. These wooden earrings lightweight, and do not tug on the ears. Also, they go well with any outfit.


 Greenish-blue pairs of earrings are sure to add the perfect touch to any casual outfit, and the price point is sure to please as well.  This pair was purchased from Forever 21.


This concludes today’s short post, I hope you enjoyed it. Just a reminder to any subscribers, I will be changing the time period for sending out the notifications feed. I will let you know next post what the timing will be. If you have any questions, do not wait, ask me anytime through twitter (@electric_blush), or in the comments below. Enjoy the rest of your day, and thank you for reading.


Happy Earring Shopping

^_^

Friday, 22 July 2011

Endless Bun


Hello my patient readers! How are you all today? I did not like keeping you waiting, if you wanted to read the latest post, but I was so busy this week. I had gone for a blood test a couple days back, so I was not lively enough to even post. It hurt, regardless of what the lab technician told me. I will not go into detail about the blood, but I will show a picture of my arm. Don’t worry; there is no visible blood.   


Well, onto today’s post!

I made this hair tutorial one that is easy to follow, yet looks as if you had spent a fair amount of time perfecting the look.Let's start!


Step one: Gather hair into a ponytail at the middle of the rear of your head, it should sit at about eye level. Pull taut, but do not make it too tight.


Step Two: Put a bit of slack in the pony tail. To do this, locate the middle of the ponytail, right above the hair thing. Stick your finger right in the middle, and separate into two equal parts. Put a bit of space between the two parts of hair by gently pulling them about a few centimeters apart.


Step Three: Take the tail of the ponytail, with the other hand, and pull it through the bottom of the newly created space. It should look like this:


Step Four: Repeat the last step, until you cannot pull any more hair through.

Step Five: Secure the ends and any exposed locks of hair underneath the newly created bun, near the nape of the neck.


You have just created an endless bun! This hairstyle is perfect for school, work, or even a casual get together. It may look slightly odd in the photos, but I assure you, it looks better when you see it for yourself. Now get going, and try the endless bun.


Happy Styling


^_^

Tuesday, 19 July 2011

Update :)

Hello everyone, how are all of you? I know I have not been on this blog for a few days, but I will have a hair tutorial posted tomorrow, and an earring post up soon after. This week has been exhausting and very  busy for me, which is the reason why I have been neglecting it for a couple of  days. I hope you guys like the hair tutorial. Well, take care everyone, I am going to head to bed soon.


Happy Waiting


^_^