 |
| Source: sephora.ca |

Showing posts with label eyes. Show all posts
Showing posts with label eyes. Show all posts
Saturday, 1 September 2012
Fall Makeup Trend: Neogrunge Makeup
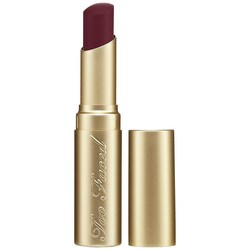
Hello my feisty readers! Fall makeup is looking very reminiscent of past trends, and one that particularly stood out to me was the comeback of grunge elements in this year's looks. I was flipping through a few magazines, and even noticed a few people on the streets wearing daring shades of lipstick that was more commonly found in the 90's.Rich chocolate browns and brownish plum lipsticks of yesteryear. How about you readers? Would you ever rock this past trend? Who knows, it may last for the rest of the winter.


Sunday, 22 April 2012
Urban Decay 24/7 Glide-On Pencil Review
Hello you
wonderful readers! How are you? Today’s review will be on the Urban Decay 24/7
Glide-On Eye Pencil. I originally purchased this product from one of the
Shopper’s Drugmart in my hometown. It came in set, which contained the eye
pencil in Zero (can be described as a carbon black), the same type of eye
pencil in the shade Ransom (deep eggplant), as well as a bonus Grindhouse eye
pencil sharpener. I should have posted this earlier, but I wasn’t feeling well
last week, which knocked my whole schedule out of orbit. Well, on to the review!
Urban Decay
is known for their high quality, cruelty free, vegan –friendly, products. That
may have been a mouth full on its own terms, but it’s purely good stuff. I have
a ton of eyeliners, I won’t lie, which automatically makes me an expert on this
subject (kidding, don’t own THAT many liners).
The liners are enriched with
jojoba oil, which means they will not dry out and turn waxy like other liners I
have tried. These pencil liners glide on smoothly, and effortlessly, and do not
tug on the delicate eyelids. They are easy to smudge, within the first minute
or so, and then the liner will not budge afterwards, which is a plus. Usually,
with waterproof eyeliners, you can never get the product to be able to do both.
I really admire the fact that the pencils are creamy, and highly pigmented,so you do not have to apply a lot of pressure, when lining your eyes. The picture below, is my eyeliner, after wearing it for about 12 hours, and it the line is still opaque. usually, the liner will start to fade by the end of the day, or even start to smudge down to my lower lashes. I did not have this problem with these eyeliners, and I am truly impressed.
Another great feature, is how easy it is to remove at the end of the day, with my makeup remover. Yes, this is a waterproof product, butt I found that it could be whisked away from my eyelids, without a lot of effort. This is a great feature, as it saves you a lot of time, when removing your makeup.
Now, it's time for the verdict! This product is effortlessly easy to use, without any hassle: no messy smudges, no fading, and no disappointment. These are some of the best liners that you can come across, so please consider trying them out if given the opportunity. You can buy this wonderful eye pencil duo, ( which have a few other colour combinations), from Shoppers' Drugmart ($30 CAD), and the other respectable establishments. I hope you enjoyed my review, thank you for reading.
Happy Spring
^_^
I really admire the fact that the pencils are creamy, and highly pigmented,so you do not have to apply a lot of pressure, when lining your eyes. The picture below, is my eyeliner, after wearing it for about 12 hours, and it the line is still opaque. usually, the liner will start to fade by the end of the day, or even start to smudge down to my lower lashes. I did not have this problem with these eyeliners, and I am truly impressed.
Another great feature, is how easy it is to remove at the end of the day, with my makeup remover. Yes, this is a waterproof product, butt I found that it could be whisked away from my eyelids, without a lot of effort. This is a great feature, as it saves you a lot of time, when removing your makeup.
Now, it's time for the verdict! This product is effortlessly easy to use, without any hassle: no messy smudges, no fading, and no disappointment. These are some of the best liners that you can come across, so please consider trying them out if given the opportunity. You can buy this wonderful eye pencil duo, ( which have a few other colour combinations), from Shoppers' Drugmart ($30 CAD), and the other respectable establishments. I hope you enjoyed my review, thank you for reading.
Happy Spring
^_^
Wednesday, 18 January 2012
Lancôme Colour Design: 5 Shadow and Liner Palette Review
Hello my wonderful readers! How are you? Today is a product review day, and I chose one of my most favorite palettes to date. The full name of the product is the Lancôme Paris Colour Design: Eye Brightening All-In-One 5 Shadow and Liner Palette. Phew! Other than being known for exquisite cosmetics, Lancôme is also known for the long names of their products. All cheesy jokes aside, keep scrolling down to read my full review on this product. Well, onto today’s post!
This palette first caught my eye when I was browsing around the makeup counters at one of The Bay department stores. It was a few minutes to closing, and I saw this palette and loved how the colours looked. You do not find many people wearing teal-green shadows anymore, but I believe that more people would change their mind about those colours if they took a look at the palette. I only recently saw a few other cosmetic brands posting advertisements with teal and blue eye shadows, which made me feel happy to see them. These modern shades of teal are perfect for transitioning from winter to spring (or if you live somewhere cold like me, winter to even more winter!). I am a big fan of Lancôme, as their products never fail to impress. This palette has a lot to offer, and I hope you all feel the same way after reading my review.


The first feature that deserves attention is how they give you a lot of eyeshadow to experiment with. I have two other Lancôme palettes, and both of them are only half-finished, as they give you a fair amount of product. This palette is different from the other two, as this one numbers each of the eyeshadow steps, with a number.

As soon as you open the box, you will find a folded instructions booklet. One side shows you how to achieve a wearable “day” look. The reverse side will show you how to achieve a “night” look. This is a very useful resource for those who are just starting out with makeup.

As soon as you open the box, you will find a folded instructions booklet. One side shows you how to achieve a wearable “day” look. The reverse side will show you how to achieve a “night” look. This is a very useful resource for those who are just starting out with makeup.
.jpg)
The instructions and numbered steps is not why I had bought the palette. It was purchased because of the beautiful colours, and how they look flattering on a lot of skintones. I was a bit worried that the colours would not look very flattering on my skintone, but as soon as I applied the bright teal shade to my lids, I loved the way it looked. Here are the swatches for all the colours below:


Another great feature of the palette is that every shade is numbered 1-5, so you know which one to apply. Another thing I would like to compliment is how the shades (like always) are smooth, and not chalky, and do not crease on me. Also, they are all perfectly pigmented, not too bright, and not too subtle. You can easily amplify the brightness with another layer of colour for a more dramatic effect, but I believe the colours make the right amount of impact as it is.
I would definitely recommend buying this palette, especially during the winter season, as you will get a lot of chances to experiment with the colours, as they just scream winter glamour. Pictures will go up; I just have to keep studying, for the time being. So go to your nearest Lancôme counter and try out the palette for yourself! Well, there you go! Thank you for reading this post, and enjoy the rest of your day.
Happy Studying
^_^
Thursday, 22 September 2011
How To Appear More Awake
Hello my fellow readers! How are all of you today? I have been away from blogging for too long, but I have a post for you all today. I recently got my vivera (by Invisalign) retainer from my dentist, and it is rather irritating. You have to take it out every time you want to eat, and you have to take caution as to not grind your teeth while sleeping or to accidentally crush it, otherwise you wait weeks for a new one. Even braces were less of a hassle than this piece of plastic! I also came back from a rafting trip yesterday for one of my classes, so I was too tired to post. I’ll upload the pictures for this post later. Well, onto today’s post!
As the generations progress, it seems as though us humans get less and less sleep every year. For a lot of us, it is not that we do not have enough time (unless you’re in university, have children, have to deal with a crisis etc), it’s just that we do not want to use our time wisely. The introduction of more efficient devices allows for us to waste as much time as we want, and get even less sleep. Well, if you actually do not have enough time to sleep due to serious reasons, then I have a few makeup and beauty tips for you:
Tip #1: A simple product, such as peach coloured or white pencil liner, is one of the most discrete ways that you can appear more awake. Keep your eyes open, and gently swipe a cotton swab along your lower waterline. Then, apply a couple layers of the pencil liner. Wait a few seconds and do the same to the upper waterline.
Tip #2: If your eyes appear red due to lack of sleep, use a dark navy liner in any form, and tight line your eyelashes. Next, make a line as close to the lash line as possible, and gently smudge. The blue in the eyeliner seems to make the redness in your sclera (the white space surrounding the limbal ring of your eye, which encircles the iris) disappear, but only you will know that.
Tip #3: If you get puffy eyes from not sleeping, try keeping them closed for an extra ten minutes, and then apply ice covered in a cloth to the area. Gently press on your cheek bones after about five minutes with your fingers to decrease the amount of fluid under the eyes.
Tip #4: Invest in a good brightening concealer. Brightening concealers differ from a regular concealer, as they usually are pink based, to give your eyes a pearly look and helps you look more awake. If you do not use concealer, try buying a highlighting product, such as shimmery baked pearls. You can easily swirl a brush in the pigment pearls and brush it over areas that need brightening.
Tip #5: Drink a lot of fluids; it can help you become more alert throughout the day.
Tip #6: Take advantage of dark circles, and apply a dark sandy eyeshadow along both the lower and upper lash lines, and blend for a perfect smoky eye.
Tip #7: Apply an earthy shade of eyeshadow all over the eyelids, and then apply a shimmery shade in the center of the lids to make them appear larger and alert.
There you have it! A few tips to help you appear as if you have had a good night’s rest. I as planning on doing a tutorial tomorrow, but I will keep it a secret. I appreciate all of you that read my blog, and those that have subscribed. Thank you guys, and stay posted.
Happy Testing
Monday, 12 September 2011
Urban Decay 24/7 Waterproof Liquid Eyeliner
Hello you wonderful readers How are you all doing I’m back to blogging again, my workload has finally gone down. First few weeks of school are always full of cramming for quizzes and half-finished assignments. The current pile of homework can wait for now. I have been itching to blog for a while, but you need enough time to sit down and write in peace, without having to finish equations or draw graphs. Today’s post will be a review, and hopefully a lash tutorial tomorrow. I was holding off on tutorials because other people happened to be doing similar tutorials at the same time I was about to post them. Well, onto today’s post!


Urban Decay seems to always have never-fail products that are worth every penny. Today’s product is no exception. I was frantically searching in Sephora for a good liquid liner, as I had not tried one before. I prefer the look and versatility of a pencil, cream or gel liner, but decided to try a liquid liner. I was looking for the perfect viscosity for my first liquid liner, one that was opaque and a bit runny. I came across the Urban Decay Waterproof Liquid Eyeliner in the colour “radium”. They had about 5 colours in stock at the store, but I believe there are a few more. This colour is bright without being flashy, and contains the right amount of fine glitter in it. I also prefer this brush to the other ones I had tried out at the store. The other ones felt a bit too ridged, or they were too pliable. This one meets the two kinds in the middle. The brush appears to be made out of felt that allows for a bit of flexibility when drawing the lines.

Another great feature is that it is waterproof, but is easily removable with an exceptional eye makeup remover. I did find out that it is not completely smudge-proof, like a lot of liquid eyeliners, but the colour is not easy to smudge either. It lasted all day, which earns it a huge gold star in my books, as it lives up to its promise.
The price is not a very welcoming trait for those on a budget, but you do get quite a trustworthy product. A little bit of this liner on your eyelids is nothing to complain about, it still offers unbelievable opaque colour in a thin layer. In this picture here, I had applied two coats, as it was my first time handling the brush.
To conclude this review, I would like to say how enamoured I am with the effectiveness of this product. It may be a bit tough to handle for first time makeup users, but do not fret, using it can help you become better at handling these types of liners. I recommend this to any fans, new and old, of Urban Decay’s growing number of amazing products.

There you have it! A review I have been trying to post for a while now is finally out. What’s your favourite brand/type of eyeliner? If you would like, leave a comment below or reach me through Twitter (@electric_blush). I recently looked at my post views, and I am pleased with the large number of you that have been searching up my tokidoki Punk Lash review from a little while back. It makes me happy seeing visitors from all over the world seeking a review on this product, and coming across my blog. Well, thank you for reading, and stay tuned for the next post!
Happy Eyelining
^_^
Wednesday, 13 July 2011
Summer Smoky Eyes
Hello again my charming readers! I hope that all of you found something fun and exciting to do over the summer. I promised a summer smoky eyes tutorial, and here you go. This should take no more than 3 minutes to create, and even then it appears as if you spent hours attempting the perfect eye effect. The best part, about this look, is that it can be worn everywhere, as it is not too shimmery, glittery, or too plain. It is flattering on most skin tones, and even works for those who choose to wear glasses. I was originally going to use green, but I decided that purple would be the perfect color, as it represents the mystery and carefree nature of summer. I will list the products used at the end of the post, and photos of the product will be posted tomorrow. Let’s begin.
Step One- Before you start applying eyeshadow, apply concealer all over the under eye area and the lids. This will make the colours appear more vibrant, and also less likely to crease throughout the day. If you desire a different effect, please be free to skip this step.

Step Two- Take a bright purple cream eyeshadow, and apply it all over your lids and crease area with your finger. Gently blend the colour into your lids.

Step Three- With a square eyeshadow brush, gently swirl the brush into a dark purple cream eyeshadow, and place on the outer third of your eye. Go past the limits of your outer lids, and create a rounded shape similar to the on in the picture.


Step Four- Using an angled eyeshadow brush; pat a powder eyeshadow in a similar colour over the newly created outer limit of your lids. Gently blend the colour outwards.

Step Five- Select a rich dark brown eyeshadow, a shade like milk chocolate, and draw a subtle line going from the beginning of the outer third to the newly created ending. Sweep a bit of the brown on the natural outer “V” of your eyes.

Step Six- Using the same brown shade, and gently line the lower lash line, until the middle of the lashline. Blend inwards with you finger.

Step Seven- Finish off the look by curling lashes, and applying a light coat of mascara.


There you go! An easy take on a smoky eye, and it did not take very long. I hope you guys enjoyed this look, and I hope it inspired you to make your own summer smoky eye looks. The anime eyes tutorial will not be up for a while, as I am experimenting with many different colours, and cannot decide on the right one. Oh well, stay posted, I shall have other fun stuff by tomorrow.
Happy Shading
^_^
Subscribe to:
Posts (Atom)